Creating a Great Charcuterie Board
If you take a look around, it seems that charcuterie boards are taking over! They’re all over social media and cooking shows. There are new businesses popping up that specialize in creating them. And restaurants are adding them to their menus in various shapes and sizes. They’re definitely trendy right now.
The Organic Kitchen says that: Charcuterie is the culinary art of preparing meat products such as bacon, salami, ham, sausage, terrines, galantines, ballotines, pâtés, and confit. And, while this is a long-practiced kitchen skill that goes back several centuries, it’s gained popularity in recent years thanks to artisan charcutiers who are producing salamis, sausage, and other cured meat in small batches.
The great thing about charcuterie boards is that you can make them yourself! Just keep a few of these things in mind as you do it – and you’re sure to have an Instagram worthy board!
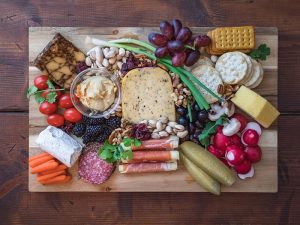
- Choose Your Vessel: Presentation is key when it comes to creating a fantastic looking charcuterie board. You want to have something that’s big enough to hold everything you want on it – but not too big so that there is lots of open space. Cutting boards and flat platters work great. You might also try a basket with a flat bottom or even create it directly on a clean table.
- Keep Things Varied When It Comes to Meats and Cheeses: Of course, you want delicious cheese and meats, but be sure to keep them varied. Nobody wants a tray full of cheddar cheese and salami. Food Republic shares “The 30 Essential Cured Meats to Know” and there are lots of delicious ones you can choose from. Foodness Gracious shares his picks for cheeses in “5 Must Have Cheeses for the Ultimate Cheese Board.”
- Have Some Pre-Sliced Items: While it’s important to keep things varied when it comes to flavors, it’s also essential to keep things varied for your presentation. Have some items that are pre-sliced – whether it be meats or cheeses – to help with your esthetic.
- Have Some Items People Will Need to Slice: You also want to have some things that people will need to slice. This allows you to put a larger item or two on your tray to create an interesting visual.
- Have a Great Tasting Spread: Place a spread or two on your board for a different texture. This could be whole-grain mustard, honey, fig jam, or a cheese spread. Look for a spread (or two) that will complement what you are serving.
- Choose Some Add-Ons: Of course, you need some additional things on your charcuterie boards. You could add some nuts such as almonds, walnuts, or pecans. Fruits are always a good choice. You could go with fresh apples, sliced pears, or grapes. Or, consider adding some dried fruits like cherries, apricots, and mangos. Vegetables are another excellent addition and can add some color with things like carrots and radishes.
- Add Crackers, Bread, Pitas, etc.: You will also need some things to place your cheese and meats on. Crackers, sliced bread, toast points, and pita chips are tasty additions.
- Make a Plan: When it comes time to assemble, create a plan in your head. You want to vary the colors, cuts, and flavors on your board so that not all of the similar things are placed close to one another. (You can always head to Pinterest or Instagram for some inspiration when it comes time to put your board together.)
- Enjoy: Once you’ve got your charcuterie board together, there is nothing left to do but ENJOY! (And snap a picture, of course!)
If you’re a fan of a good charcuterie board, then it’s time for you to create your own! Decide what you’d like to serve and put your creativity to work!

